Monday, 1 October 2012

Network Magic

I’ve never taken a formal class on the finer points of networking, but I have managed to learn enough to set up a home network. But it was not the easiest process, and I’m sure I’m not the only one who has encountered difficulty with this project. So when I found a program that promised to act as a central point to setup, manage and even fix my network, I thought I would check it out. So this week, I’ll be sharing with you: Network Magic v4.0
Installation is very quick, due to minimal options. Just agree to the license, choose a program folder, and the files are copied. Finishing will automatically launch the application and its wizard. Note that Network Magic will add two desktop icons, a system tray icon and an entry in the Start Menu.
The wizard will guide you through monitoring, connecting, sharing files and protecting your network. The first step lets you know that NM will need internet access to send anonymous statistics to and receive updates from the website, so any firewall you may have might flag it. A link to the privacy policy is supplied, should that interest you. I had no problems with NM and Windows Firewall. NM will then detect your router and ask for your router’s username and password. I did not feel comfortable giving these to a new program, but thankfully you can skip this step, so I did. Then you can name your PC for identification on the network. If a network already exists, your PC’s name will be filled in already. Changing the name for the program will not change it for Windows, so feel free to call each PC anything you like. Next, it will tell you about the differences between the Premium (which you receive for 30 days) and the Free version; mainly file and printer sharing. Keep in mind that Network Magic cannot prevent Windows from controlling these options, only the free version program from using them. So do not worry about updating Network Magic to Premium just to keep printing over a network. Finally, you need an e-mail address, but the message is nothing important, so feel free to use a junk e-mail account. Be sure to set one up with a free web mail provider if you haven’t already for just this sort of situation.


While the convenient in-program file sharing expires in the free version, the other features still make Network Magic on a compelling package for anyone new to networking. By breaking down your devices and helping fix problems, Network Magic can save a networking novice from the complexity and confusion that networking can bring on. Check it out on www.networkmagic.com

Old Printer Tips: Convert, Network-Enable or Go Wireless

If you’ve been using computers a long while you probably have an old printer lying around somewhere. And it’s most likely true the only reason you don’t use it is either because:
  1. It’s too big to fit on the desk.
  2. It uses an insanely thick cable with a Centronics connector to connect to your computer.
  3. Your computer (especially if a laptop) doesn’t have the port where that insanely thick cable is supposed to plug into.
Assuming you can acquire a printer ribbon (if dot matrix) or replacement toner (if laser) for it, you can resurrect that printer using modern tech.
Converting Centronics to USB: Only takes a single cable to do this. And being the printer is old it’s more or less guaranteed to be recognized by your computer without the need to install any drivers whatsoever.
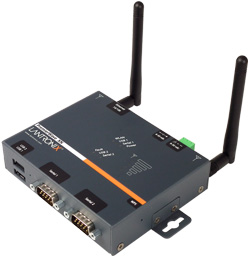
Connect printer directly to the router: Requires a miniature print server. This connects via Ethernet directly to the router and network-enables the printer. No connection to the computer required (but some setup does need to take place.)
Connect printer over Bluetooth wireless: Requires an (expensive) adapter. Also may require another (not-so-expensive) USB Bluetooth adapter if your PC isn’t Bluetooth-enabled. The adapter mentioned for the printer does Centronics and USB! Wireless range is stated to be 100 meters (328 feet) but in practical application you’re “safe” with about 25 meters (82 feet) at the most. Works well in most instances. The best part is that you can have the printer in a completely separate room – leaving you more desk space.

Some quick truths about older printers

Dot matrix printers while loud and have a slow PPM (page per minute) speed have two distinct advantages.
  1. Tractor feed paper, if available, is dirt cheap.
  2. You can easily go for an entire year without having to change the printer ribbon.
Older business-grade HP LaserJet printers also have a slow PPM but have the following advantages.
  1. New toner, shockingly, is sometimes cheaper than inkjet replacement cartridges.
  2. Toner lasts far longer than inkjet cartridges do.
  3. Biz-grade LaserJets can be easily serviced. Chances are high that there’s a local certified HP tech close to where you live – and he does house calls.
  4. Older LaserJets require no stupid proprietary drivers because support is built-in to the OS. Windows, Mac and Linux will “see” these printers with no fuss, no muss

Set up multiple printer drivers

As we all know, printers are quite affordable these days, but they absolutely kill you and beat you silly when it comes to the ink for that printer. A way to save money on ink is to print in black only. Blank ink is cheaper than colored. When you print something, you can always go into your printer driver settings and set it to gray-scale or black-only, but you can save time by simply setting up another instance of your printer drivers with the black-only setting permanently on. Simply install a separate instance of your printer drivers – one for black and one for color. Then, when you need to print something, you can either make your desired printer default and print, or you can simply choose which “printer” you wish to print with. Note that you can also do this for other settings as well. This will save you a little time, and a little money

Set A PDF Printer As Your Default

Many of you probably have a PDF printer installed on your machine (if not, you should get a free one such as CutePDF or PDF Creator). If so, set it to your default if it is not already.
The reason is simple: if you accidentally print something to a paper printer you waste the paper and ink it comes out on. On the other hand, if you accidentally print something to PDF, no harm.
Unless you do an unusually large amount of printing, you probably will not even notice the difference.

Adding a TCP/IP Printer

If you have a network printer or a printer connected to a print server appliance such as an HP JetDirect, you will need to connect to that printer via TCP/IP. To do so, go to Control Panel -> Printers and Faxes. Click File -> Add Printer and press next. Choose “A local printer attached to this
computer” and uncheck the box below it. When the next screen comes up, choose the radio button for “Create a New Port” and then select “Standard TCP/IP port.” A new wizard will appear so click next. Type in the IP address of the printer in the top field, and press next. If everything went right, you should have a new port. Sometimes, Windows has a tough time detecting the printer, and you have to configure the settings manually. If all else fails, keep clicking next. Eventually you should be lead back to the original screen that you were at, and you should choose “Use the following port” this time, selecting the TCP/IP port that you just created. Finally, run through the rest of the dialogue (drivers and such) as you would do for any printer. Note that some printers require that you connect to them on a special TCP/IP port number, and that must be manually configured.

How To Share a Printer on Network

What’s a network without a printer? Sharing your printer
among the network computers is a simple process. Follow these steps:
  1. The first thing you must do is tell Windows 95 to redirect
    printing from the LPT1 port to the network queue. To do so, double-click the Printer’s
    icon in Control Panel and then double-click the Add Printers icon.
  2. Windows 95 will open Add Printer Wizard, click the Next
    button
  3. Select the Network Printer radio button, and then click
    Next again.
  4. The Add Printer Wizard will ask you to provide the path to
    the network printer. Enter it in the format: \\computer name\share name where computername
    is the name of the computer to which the printer is physically attached, and sharename is
    the share name that you’ve assigned to the printer.
  5. The Add Printer Wizard also asks if you print from
    MS-DOS-based programs. Click the YES radio button, and then click the Next button.
  6. In the Add Printer Wizard’s next dialog box, select the
    type of printer you’re trying to capture by selecting the printer’s manufacturer from the
    Manufacturer’s list and choosing the printer model from the Printer’s list.
  7. Click the Next button to continue.
  8. At this point, the Add Printer Wizard will ask you to
    assign a name to the printer. This name isn’t the same as the printer’s share name.
    Instead, it’s the name that your local PC will use, and it will appear under the printer’s
    icon (title) and in any Select Printer windows.
When it finishes copying the printer drivers to your hard
drive, it will create an icon for the printer. You can now print to the printer in exactly
the same way that you would if it were physically attached to your PC

Sunday, 26 August 2012

Mac OS X Installition

This guide is provided in order to make it easier for you to free up valuable hard drive/SSD space on your MacBook Air (MBA) by reinstalling Mac OS X with only the components that you really need. It is recommended that you perform these steps before you install a bunch of applications and data files, because these steps will reset your MacBook Air's hard drive/SSD completely. Performing these steps can free up as much as 8 GB of hard drive space for you to use.


Performing a Clean Install

If you want to perform a Remote Install using another computer's DVD drive (Remote Disc), click here.
If you have a SuperDrive or some other USB-connected external DVD drive, here are the steps to follow to perform a clean install of OS X:
  1. Insert your Mac OS X DVD #1 into your SuperDrive or other USB-connected external DVD drive.
  2. Shut down your MacBook Air. Then, turn it back on and hold down the C key to boot from the Mac OS X DVD. The Apple logo will come up and the "processing" indicator will spin for a while.
  3. The screen will eventually turn blue, and then you will see the nebula wallpaper and be prompted to select a language. Select "Use English for the main language", or select your appropriate language. Then, click the "-->" button. The Mac OS X Leopard Installer window will appear.
  4. In the Utilities menu, select Disk Utility. The Installer window will disappear and the Disk Utility window will appear.
  5. Once disk information has been gathered, select your hard drive. This will be the item ABOVE "Macintosh HD". In the case of a 64 GB SSD, the item should be called "55.9 GB MCCOE64GEMPP" or something similar.
  6. Click Partition. Under Volume Scheme, select "1 Partition". In the Name box, type "Macintosh HD" or whatever you want your hard drive to be named. Then, click Apply. Click Partition to confirm repartitioning of the hard drive/SSD. It will take a few seconds for the drive to be partitioned. Once it's done, quit Disk Utility. The Disk Utility window will disappear and the Installer window will reappear.

    IMPORTANT: If you fail to perform steps 4-6, you will not have a clean install, and it is possible that you will not be able to prevent applications from being installed.
  7. In the Installer window, click Continue. Click Agree to agree to the software license agreement (you can read it first if you really, really want to).
  8. In the "Select a Destination" window, select your hard drive ("Macintosh HD" or whatever you called it). Click Continue.
  9. In the Install Summary window, click Customize (lower-left corner of the dialog box).
  10. In the list of package names, you can turn OFF (uncheck) any or all of the following items, depending on whether you think you will ever need them. Turning off all optional items can free up around 8 GB of disk space for you to use.
    • Printer drivers (3.4 GB): You can opt to not install ANY printer drivers by clearing the Printer Drivers checkbox. You can also install just specific printer drivers by turning ON only the checkboxes for those printer drivers you think you might need (Hewlett-Packard, for example).
    • Additional fonts (141 MB): This installs font support for Chinese, Korean, Arabic, Hebrew, Thai, Cyrillic (Russian), Devanagari, Gujarati, Punjabi, Tibetan, Armenian, Cherokee, and Inuktitut alphabets. If you want to save 141 MB because you're sure you won't need this, you can turn the Additional Fonts checkbox OFF. However, it is recommended that you install this in case you access web sites that use any of those alphabets.
    • Language translations (1.8 GB): If you are only ever going to use one language (English) on your MacBook Air, you can turn this option OFF. Individual languages may be installed by turning ON their checkboxes. Each language is roughly 100 MB in size.
    • X11 (117 MB): This option allows you to run Linux and UNIX apps in OS X. You can turn this option OFF if you are sure you will never do this.
    • Bundled applications (3 GB): This contains many separate items which you may or may not want to install:
      • CPU help files (262 MB): This is the user's manual for the MacBook Air and for Leopard, so this is probably a good thing to install.
      • iWeb (290 MB): iWeb is the iLife web design application. If you don't plan to use it, you don't need to install it.
      • Garageband (1 GB): You can clear the checkbox for GarageBand if you choose. Note that the "GarageBand Additional Instruments and Loops" option (1.3 GB) is turned OFF by default.
      • iDVD (559 MB): You can clear the checkbox for iDVD if you choose; the MacBook Air has no built-in optical drive, so it's likely you will not use iDVD on your MacBook Air. As with GarageBand, the "iDVD Extra Content" option (342 MB) is turned OFF by default.
      • iPhoto (553 MB): You can clear the checkbox for iPhoto if you choose.
      • iMovie (136 MB): You can clear the checkbox for iMovie if you choose.
  11. Once you've made the changes you want, click Done. Then, click Install. Click Continue Installation once you verify you have both Mac OS X DVDs.

    NOTE: You can click Skip if you want to skip the DVD consistency check. This will save you a lot of time in the installation process.
  12. When the Installer is done with Mac OS X DVD #1, the MacBook Air will automatically restart and eject OS X DVD #1. When this occurs, go ahead and insert OS X DVD #2; YOU MAY NOT BE EXPLICITLY TOLD TO INSERT THE DVD. Insert the DVD and installation will continue automatically for about 10 to 20 more minutes. When installation is complete, you will be prompted to click Continue.
Mac OS X DVD #2 will be ejected and your MacBook Air will automatically reboot and you will go through the normal first-time experience (selecting language, entering Apple ID, creating user account, etc.). When this process completes, you should see that you now have more free hard drive space available than before.

Using Remote Install

If you want to reinstall OS X using another computer's shared DVD drive (Remote Disc):
  1. Insert the Mac OS X DVD #1 into the DVD drive of the other computer.
  2. If the other computer is a Mac, with its software up to date, launch the application /Applications/Utilities/Remote Install Mac OS X from that Mac's hard drive. If it's a PC running Windows, choose "Remote Install Mac OS X" from the Install Assistant when it appears.
  3. Read the introduction (if you really, really want to) and click Continue.
  4. Choose the install disc you want to use, and click Continue.
  5. Choose a network connection: AirPort, if you are using an AirPort/WiFi network, or Ethernet, if the other computer is on an Ethernet network and you have an optional Apple USB Ethernet Adapter connecting your MacBook Air to the same network. Click Continue.
  6. Restart your MacBook Air and hold down the Option key as it starts up, until you see a list of available startup disks.

    IMPORTANT: This step is critical. If you don't hold down the Option key on your MacBook Air until the list of startup disks appears, you may not see the menu. It is recommended that you hold down the Option key until you actually see the OS X Installer appear.
  7. Click Continue in Remote Install Mac OS X.
  8. If you chose AirPort as your network in step 5, on your MacBook Air, choose your AirPort/WiFi network from the pop-up list. If the network is secure, you will be prompted for a password. You can enter a private network name by choosing the ellipsis (...) and typing the name.
  9. If you chose AirPort as your network in step 5, when you see the AirPort status icon indicating signal strength, click Continue in Remote Install Mac OS X.
  10. Once the OS X Installer begins to run, continue with step 3 in the section Performing a Clean Install.
It is also recommended that you temporarily remove security/passwords from your WiFi network before attempting the Remote Install process.

More Things You Can Remove Manually

You can also free up additional disk space by performing the following:

Delete the "Alex" voice

If you use the Finder to go to /System/Library/Speech/Voices on your hard drive, you can delete the folder "Alex.SpeechVoice". This will free up an additional 670 MB of disk space.

Switch to Hibernate Mode 0

By default, Apple notebooks (including the MacBook Air) ship from the factory in "Hibernate Mode 3", which writes the contents of RAM out to a file called sleepimage on the hard drive just before power runs out completely. This allows the notebook to safely return to its pre-power failure state when power is restored. The size of the sleepimage file is equal to the amount of RAM you have installed in your notebook, so on a MacBook Air, the sleepimage file is 2 GB in size. If you don't mind the risk of what will happen if power fails completely and your programs are not written out to the sleepimage file, you can turn off that feature by switching to Hibernate Mode 0 and reclaim 2 GB of hard drive space. To do this:
  1. Launch the Terminal application (Applications > Utilities).
  2. At the prompt, type pmset -g | grep hibernatemode and press Return. (NOTE: The "|" is a pipe symbol, the character above the "\" symbol on your keyboard. This is NOT a lower-case "L" or upper-case "i"!) You will see your current Hibernate Mode setting.
  3. To change to mode 0, type sudo pmset -a hibernatemode 0 and press Return.
  4. To remove the sleepimage file, type sudo rm /var/vm/sleepimage and press Return.
Note that at any time, you can return to Hibernate Mode 3 by typing sudo pmset -a hibernatemode 3 and pressing Return in the Terminal window. This will automatically recreate the 2 GB sleepimage file.

Readding Components Later On

If later on you want to install something you chose not to install using the above steps, you can insert the Mac OS X DVD #1 into your DVD drive (SuperDrive or shared Remote Disc) and then double-click Optional Installs > Install Bundled Software Only > Continue > Continue > Customize. This will let you (re)install the CPU Help Files, iWeb, GarageBand, iDVD, iPhoto, and iMovie.

MacBook Problums (Recovery & Reinstall )


Flashing Folder with Question mark comes up at starup MacBook

Reinstalling Lion Without Erasing the Drive

Boot to the Recovery HD: Restart the computer and after the chime press and hold down the COMMAND and R keys until the menu screen appears. Alternatively, restart the computer and after the chime press and hold down the OPTION key until the boot manager screen appears. Select the Recovery HD and click on the downward pointing arrow button.

Repair the Hard Drive and Permissions: Upon startup select Disk Utility from the main menu. Repair the Hard Drive and Permissions as follows.

When the recovery menu appears select Disk Utility. After DU loads select your hard drive entry (mfgr.'s ID and drive size) from the the left side list. In the DU status area you will see an entry for the S.M.A.R.T. status of the hard drive. If it does not say "Verified" then the hard drive is failing or failed. (SMART status is not reported on external Firewire or USB drives.) If the drive is "Verified" then select your OS X volume from the list on the left (sub-entry below the drive entry,) click on the First Aid tab, then click on the Repair Disk button. If DU reports any errors that have been fixed, then re-run Repair Disk until no errors are reported. If no errors are reported click on the Repair Permissions button. Wait until the operation completes, then quit DU and return to the main menu.

Reinstall Lion: Select Reinstall Lion and click on the Continue button.

Note: You can also re-download the Lion installer by opening the App Store application. Hold down the OPTION key and click on the Purchases icon in the toolbar. You should now see an active Install button to the right of your Lion purchase entry. There are situations in which this will not work. For example, if you are already booted into the Lion you originally purchased with your Apple ID or if an instance of the Lion installer is located anywhere on your computer.


Or for Snow Leopard:


Reinstall OS X without erasing the drive


Do the following:


1. Repair the Hard Drive and Permissions

Boot from your Snow Leopard Installer disc. After the installer loads select your language and click on the Continue button. When the menu bar appears select Disk Utility from the Utilities menu. After DU loads select your hard drive entry (mfgr.'s ID and drive size) from the the left side list. In the DU status area you will see an entry for the S.M.A.R.T. status of the hard drive. If it does not say "Verified" then the hard drive is failing or failed. (SMART status is not reported on external Firewire or USB drives.) If the drive is "Verified" then select your OS X volume from the list on the left (sub-entry below the drive entry,) click on the First Aid tab, then click on the Repair Disk button. If DU reports any errors that have been fixed, then re-run Repair Disk until no errors are reported. If no errors are reported click on the Repair Permissions button. Wait until the operation completes, then quit DU and return to the installer.


If DU reports errors it cannot fix, then you will need Disk Warrior and/or Tech Tool Pro to repair the drive. If you don't have either of them or if neither of them can fix the drive, then you will need to reformat the drive and reinstall OS X.


2. Reinstall Snow Leopard

If the drive is OK then quit DU and return to the installer. Proceed with reinstalling OS X. Note that the Snow Leopard installer will not erase your drive or disturb your files. After installing a fresh copy of OS X the installer will move your Home folder, third-party applications, support items, and network preferences into the newly installed system.

Download and install the Combo Updater for the version you prefer from support.apple.com/downloads/.

Mac Password Hacking


I had an interesting task at work last week. I had to prepare a Mac for some testing. 
I did some searching on Google and found a page that discusses how to hack passwords on a Mac. Various methods suggested on several pages and diffrent comments to that page had failed. Figuring I had nothing to lose I decided to try mixing the methods I had found until I found one that worked.
After only about 2 or 3 tries I came across the following method that worked for me:
  1. Restart Mac and at the login window,
  2. While the mac is restarting after chime, press and hold  “Command and S” Keys until you see text scrolling through the window. This boots the computer into single user mode.
  3. At the Localhost% prompt type:
    /sbin/fsck -y [Enter]
    /sbin/mount -uw / [Enter]
    sh /etc/rc[Enter]
  4. When the Localhost% prompt reappears, type:
passwd [username]
(Replace [username] with the username you want to change and leave out the brackets.)
You will then be prompted to type a new password for this user 2 times.
  1. After entering the new password, type:
    reboot
  2. At the login window, enter the username with the new password.Voila!
  3. Done!!!! enjoy your Mac

Wednesday, 30 May 2012

iPhone How To Unlock On iOS 5.1.1

Step: 1 First You Hvae to JailBreak
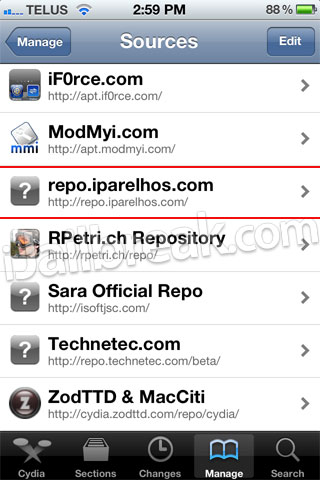
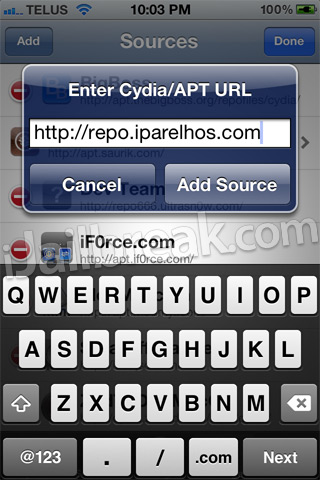
Step: 2 Now you will need to launch Cydia so we can add the 3rd party repository UltraSn0w Fixer for 5.1.1 is hosted in. When Cydia is up and running go into the Manage tab, Sources section, tap the edit button and then the add button and add the following source:

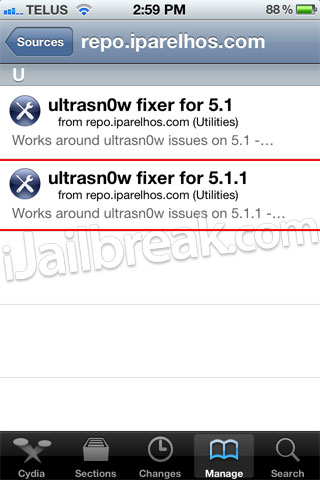
Step 3: With the source successfully added you will need to simply go into the iParelHos repo section.
Once you see UltraSn0w Fixer for 5.1.1 simply install it to your iPhone.

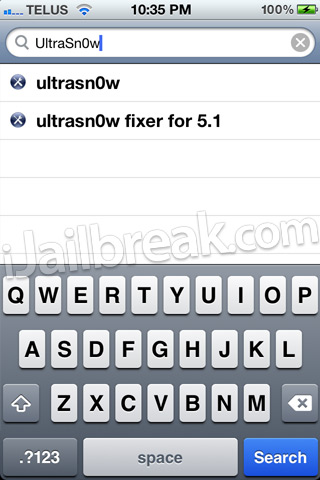
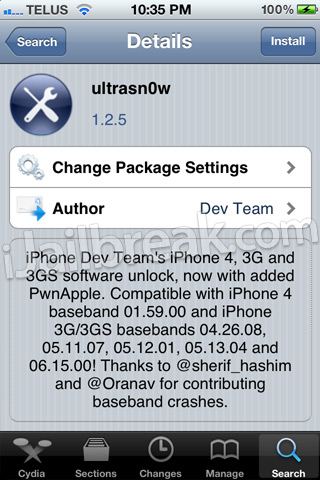
Step 4: When UltraSn0w Fixer has been installed simply go into Cydia’s Search tab and search for UltraSn0w.

After you have searched for it and see it, install it to your iPhone also and reboot.

Congratulations! You have just unlocked your iPhone 4 or iPhone 3GS running the iOS 5.1.1 firmware with UltraSn0w Fixer for 5.1.1. If you are still having troubles make sure you installed UltraSn0w Fixer for 5.1.1 before UltraSn0w. For those that did it in the reverse order you will need to uninstall both packages, reboot your iPhone and follow this how to guide once again. Please leave any further questions or thoughts in the comments section below…

iPhone 3Gs How To Jailbreak on iOS 5.1.1

Here you will learn how to jailbreak your iPhone, iPod Touch, iPad and Apple TV 2G running a variety of firmware versions. Simply scroll through our how to jailbreak section for the firmware version you are trying to jailbreak, and follow one of our easy to follow how to guides on jailbreaking your iPhone, iPod Touch, iPad, Apple TV 2G,
Note #1: We will be updating this page with the latest how to jailbreak guides when new firmware versions are released, so make sure you come back soon!

How to Jailbreak with RedSn0w [Windows]  tethered

It’s that time again when Apple has released a new firmware and Jailbreakers are desperately trying to figure out whether they should update or not. In the case of the iOS 5.1.1 firmware you should not update until we at least get word that Pod2G’s iOS 5.1 untethered exploit will work on it. If you have accidentally updated to the iOS 5.1.1 firmware however, you will be glad to know that you can indeed Jailbreak iOS 5.1.1 tethered on your iPhone 4 or iPhone 3GS using the latest version of RedSn0w. Thus, in this how to guide you will learn how to Jailbreak your iPhone 4 or iPhone 3GS tethered on iOS 5.1.1 using the Windows version of RedSn0w 0.9.10b8b.
The first thing you will need to do is download the latest version of RedSn0w, which at the time of writing this how to guide is RedSn0w 0.9.10b8b. You can download RedSn0w 0.9.10b8b from the iJailbreak Downloads Section by clicking here or from the direct link below:

Download RedSn0w 0.9.10b8b (Windows)
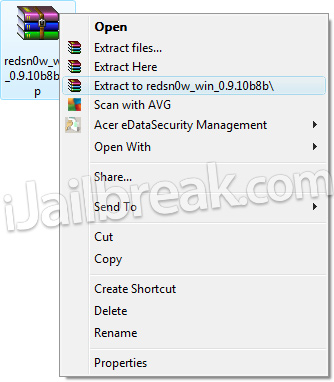
Step 2) – Once you have downloaded RedSn0w you will need to extract it by right clicking on the redsn0w_win_0.9.10b8b.zip and click the extract to folder option.
RedSn0w 0.9.10b8b Windows Guide
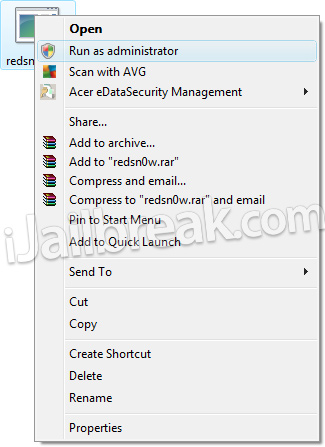
When RedSn0w has been extracted find the redsn0w.exe file, right click on it and click the Run as administrator option (if applicable).
RedSn0w 0.9.10b8b Windows Guide
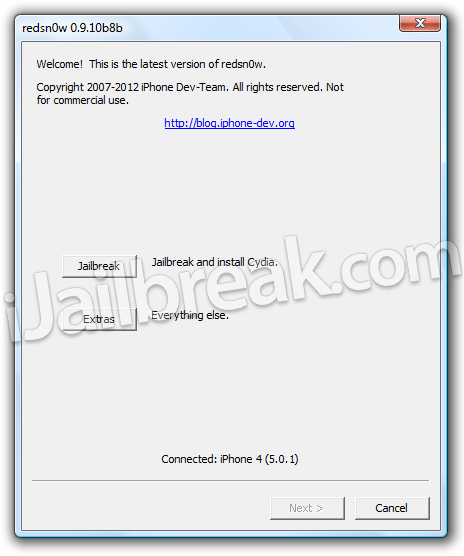
Step 3) – With RedSn0w running you will need to click the Jailbreak button.
RedSn0w 0.9.10b8b Windows Guide
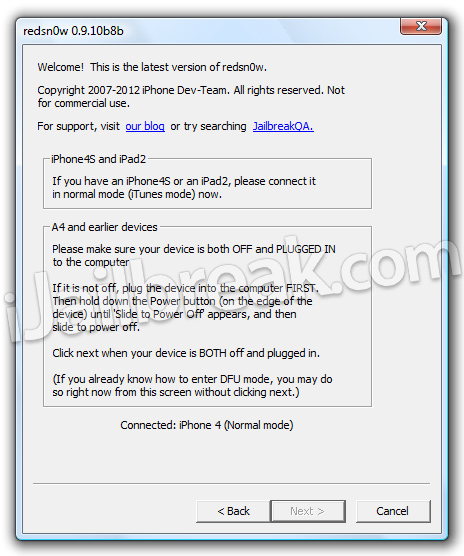
Step 4) – After clicking the Jailbreak button you will come to a screen where you will need to put your iPhone into DFU mode.
RedSn0w 0.9.10b8b Windows Guide
Read through and follow the instructions presented to you which is to plug in and power off your iPhone and then click the next button when you are ready to begin the DFU mode process.
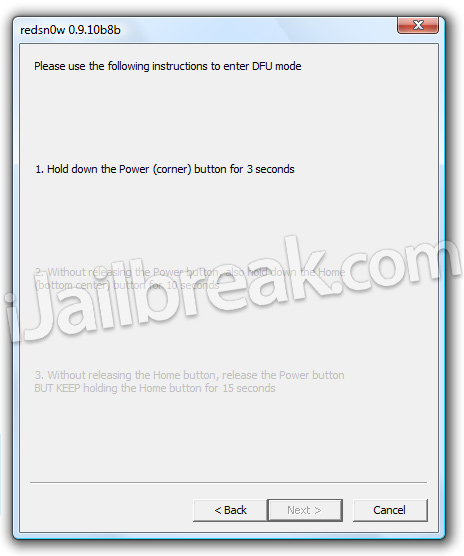
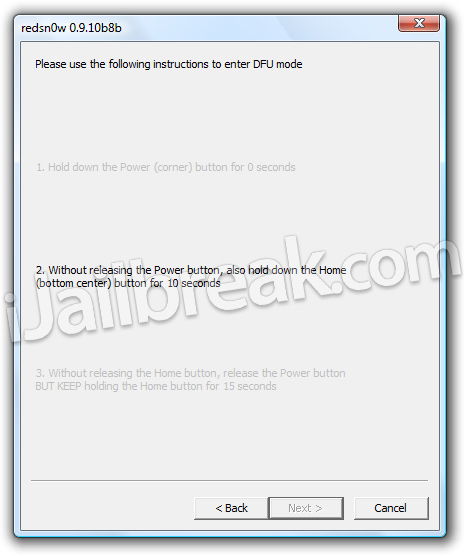
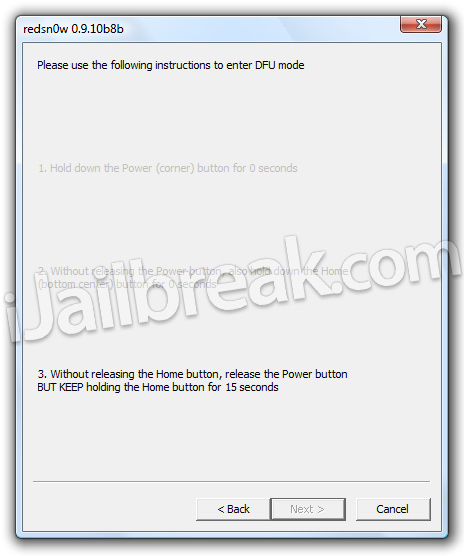
Step 5) – When you click the next button you will need to follow the instructions presented to you in real-time to put your iPhone into DFU mode.
  • Hold down Power (corner) button for 5 seconds.
  • Without releasing the Power button, also hold down the Home (bottom center) button along with the Power button for 10 seconds.
  • Without releasing the home button, stop holding down the power button for up to 15 seconds.
RedSn0w 0.9.10b8b Windows GuideRedSn0w 0.9.10b8b Windows GuideRedSn0w 0.9.10b8b Windows Guide
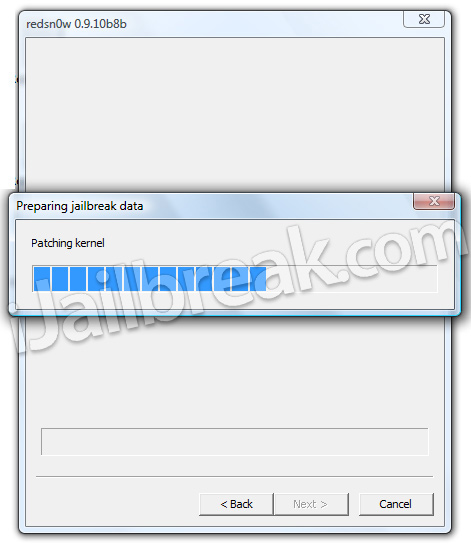
Step 6) – After you successfully enter DFU mode RedSn0w 0.9.10b8b will begin preparing your iPhone for the Jailbreak.
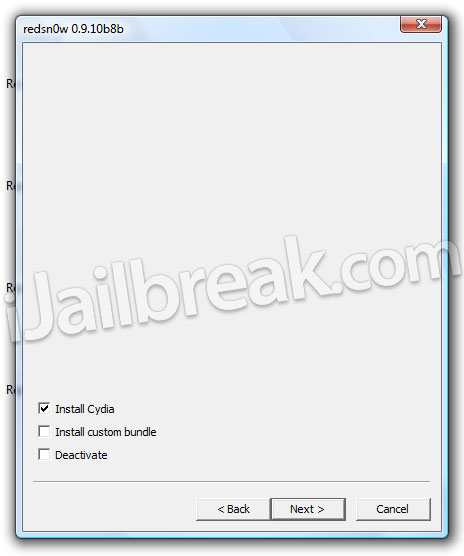
Step 7) – Once RedSn0w has finished preparing your iPhone for the Jailbreak you will be asked you to specify options to go along with your Jailbreak. The only option that you actually need to make sure is checked is the Install Cydia option. Once you have ensured this option is checked, and any other options you may want, click the Next button.
RedSn0w 0.9.10b8b Windows Guide
Step 8 ) – After you have specified your Jailbreak options you can click the next button and RedSn0w 0.9.10b8b will begin jailbreaking your iPhone. DO NOT interrupt or use the computer during this time. When your iPhone is finished being jailbroken it will boot up with the Apple logo and not go any further. This is because you have a tethered Jailbreak and you will need to put your iPhone back in DFU mode and use RedSn0w 0.9.10b8b to boot it back into a functional and Jailbroken state.
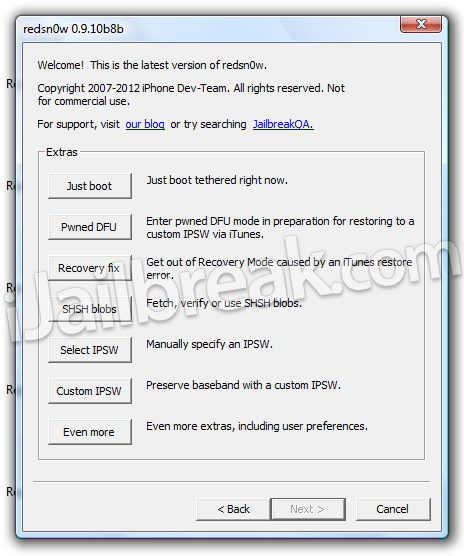
Step 9) – As explained previously when you Jailbreak your iPhone tethered you will need to plug it into your computer every time your iPhone loses power to regain all functionality. Thus, to reboot your iPhone into a functional and Jailbroken state you will need to launch RedSn0w again, click the Extras Button > then click the Just boot button and you will simply need to put your iPhone into DFU mode again.
RedSn0w 0.9.10b8b Windows Guide
Congrats! You should now have a Jailbroken iPhone 4 or iPhone 3GS running the iOS 5.1.1 firmware. For more tutorials visit the How To Jailbreak Section. Leave any questions in the comments.

Saturday, 28 April 2012

Avoid Clicking Digital Camera Flash Near Power Lines.

Using wasted energy, Richard Box was able to get over a thousand fluorescent tubes powered by low overhead power lines.


Light Field
How does this field of lights work?

The 1301 fluorescent tubes are powered only by the electric fields generated by overhead powerlines.
Richard Box, artist-in-residence at Bristol University’s physics department, got the idea for the installation after a chance conversation with a friend. ‘He was telling me he used to play with a fluorescent tube under the pylons by his house,’ says Box. ‘He said it lit up like a light sabre.’

Box decided to see if he could fill a field with tubes lit by powerlines. After a few weeks hunting for a site, he found a field, slipped the local farmer £200 and planted 3,600 square metres with tubes collected from hospitals.

A fluorescent tube glows when an electrical voltage is set up across it. The electric field set up inside the tube excites atoms of mercury gas, making them emit ultraviolet light. This invisible light strikes the phosphor coating on the glass tube, making it glow. Because powerlines are typically 400,000 volts, and Earth is at an electrical potential voltage of zero volts, pylons create electric fields between the cables they carry and the ground.

Box denies that he aimed to draw attention to the potential dangers of powerlines, ‘For me, it was just the amazement of taking something that’s invisible and making it visible,

richard-box.jpg

Richard Box, artist-in-residence at Bristol University’s physics department, got the idea for Field (2004) – 1,301 fluorescent tubes powered only by the electric fields generated by low overhead powerlines – after a conversation with a friend. ‘He was telling me he used to play with a fluorescent tube under the pylons by his house,’ says the artist. ‘He said it lit up like a light sabre.’ Box decided to see if he could fill a field with tubes lit by the ‘waste’ energy emanating from powerlines. Box denies that he aimed to draw attention to the potential dangers of powerlines, ‘For me, it was just the amazement of taking something that’s invisible and making it visible,’ he says.
via channel4
Another one of his projects.


g_landart_1.jpg

Walter de Maria’s The Lightening Field is permanently installed in the desert at Quemado, New Mexico, and was commissioned by the Dia Art Foundation, who run the site and provide accommodation for visitors. The work consists of hundreds of stainless steel rods projecting from the ground to a uniform height of around six metres (20 feet). Rows of 20 rods extend for one mile, while rows of 16 extend for a kilometre, making a square grid of standard and metric proportions. The work is designed to attract spectacular lightening strikes. (photo: John Cliett/© Dia Art Foundation)
Note:
Please avoid mobile phones on Petrol outlets & Gas Stations.
Please avoid talking on mobile phones while driving.
Please avoid talking on mobile phones while kept in charging mode without disconnecting from wall socket.
Please do not keep mobile phones on your bed while charging or on wooden furniture.
Avoid using mobile phones,Digital Cameras Near high voltage electrical lines.


Sunday, 8 April 2012

Home Protection From Microwave Radiation

1. Understand what you’re exposed to. Know the dangers of microwave ovens.
2. Use SafeSpace’s groundbreaking technologies to escape the side-effects linked to the use of microwave ovens and electromagnetic radiation.
Our products interact with—and influence—artificial EMFs, restoring coherence and balance to the fields around you by setting up a “corrective resonance.” Result: the dangers of EMFs are neutralized, and the field is harmonized.
Our products are job-specific. They’re powerful when used alone, but when used in combination (layered on top of one another) they can create a strong, highly positive resonant effect.
Appliance Patch
EMF protection from large and small appliances
Appliance Patch
Appliances of all kinds produce toxic electromagnetic fields (EMFs) that can cause a range of health problems and side effects, especially when they’re near the body for long periods of time. Placing the SafeSpace Energy Patch near the source of power on appliances, computers, TVs and more, as well as electric outlets, will help protect you against the dangerous effects of EMFs.

If it has an electric cord or a battery, it needs an appliance patch
Electromagnetic field protection from:
Appliances
Electric tools
Office equipment
Entertainment equipment
Surge protectors
Telephone wires

Appliance Patch
Send a corrective resonance through the wiring and circuitry of any appliance!
How it works
The SafeSpace Energy Patch creates a deprogramming and reprogramming effect, whereby the energetic properties of an EMF are dramatically altered. The damaging vibrational frequencies from the electromagnetic field are converted and transformed into a coherent, life enhancing field. In short, the pattern of the EMF itself is changed from harmful to harmless. Transformed EMFs like these are beneficial, and have been shown to restore equanimity and balance in the body–mind.
Appliance PatchUse: With its adhesive back, the Appliance Patch is simple to use. Place 1 patch where the electric cord enters the housing on appliances, electronic tools, office and entertainment equipment or surge protectors. Place on or near the battery on wireless devices. Note that for the special EMF challenges of cell phones and related mobile communication devices, the Cell Patch is recommended over the appliance patch.

Are Microwave Ovens Dangerous?


According to a growing body of research, yes. You need home protection from microwave radiation!
Fact, microwave ovens pose three different kinds of health threats:
Microwave Facts
  • The microwave radiation itself can leak out and damage human cells and tissues.
  • Microwaved foods have been shown to elevate cholesterol and stress and decrease white blood cells.
  • All appliances working on electricity produce a toxic electromagnetic field (EMF) of approximately 60 hertz. This is over and above potential microwave leakage.
Not ready to toss your microwave oven?
You don’t have to. Many product line offers a range of home protection from microwave radiation shown to combat and reverse the dangers of microwaves and microwaved foods. We’ll explore microwave dangers and solutions below.
What do microwaves do to food?
In a microwave oven, alternating current forces atoms reverse polarity at a startlingly high rate. This creates such violent friction that the water inside the food molecules begin to vibrate and heat up. Unfortunately, this action also deforms, impairs and tears molecules apart.
Microwave ovens are dangerous!
Take a look at how microwaves cook food (above) and then imagine what that same microwave radiation could do to your body!
Microwave leakage is serious enough that the FDA sets strict limits on it for the manufacturers. But once door seals age, leaking tends to exceed those limits, often at head level. That’s bad news, because the microwave energy inside a microwave oven is massive!
  • Frequency inside your microwave 2.45 BILLION hertz.
  • Frequency shown to start harming the human body: over 10 hertz.
That’s 2.45 billion vs. 10 hertz. It doesn’t take very big leak for the damage to begin. (One top culprit: aging door seals!)
The scary part is that you won’t feel it until the damage is long since done. No matter what, you don't want to stand in front of or close to a microwave in operation.
Harmful effects of microwaves:
  • Weakened immune systems
  • Lowered resistance to bacterial and viral infections
  • Cataracts
  • Birth defects
  • Cancer
  • Many other serious illnesses
The facts about microwaves & cataracts
  • Eyes are especially vulnerable to microwaves. That’s because unlike other areas of the body, they lack the blood vessels to dissipate the heat and cellular stress.
  • The first suspected clinical case of microwave-caused cataracts was reported by Hirsch and Parker as early as 1950's. (Sulman 1980).
  • For decades, cataracts have been reported in workers exposed to this type of radiation. (On the back of the lens where radiation cataracts usually occur.)
The dangers of microwaved foods.
Microwaves break chemical and molecular bonds, and can literally rip atoms apart, disrupting the basic biochemical structures of life. It’s no wonder foods cooked in such a way become so harmful to consume.
Government and industry studies suggest they pose no threat. But a growing body of knowledge now contradicts those claims.
Microwaved foods lose nutrition.
The Swiss scientist Hans Hertel was the first to study microwave dangers, specifically, how cooking degrades and depletes food of nutrients—an effect that shows up in study participants' blood.
Microwaving makes food unhealthy by forming harmful compounds.
When the microwave radiation destroys and deforms food molecules, new harmful compounds form (radiolytic compounds). These dangerous compounds harm the body in many ways.
Microwaved meals change blood chemistry
The research, from Search for Health (Spring, 1992): After study participants consumed microwaved vegetables, Swiss Scientist Hertel measured the following effects:
  • Cholesterol levels increased rapidly.
  • Hemoglobin decreased significantly (creating anemic tendencies.)
  • Lymphocytes (white blood cells) showed a significant term decrease.
  • Increased stress (evidence by the increase of leukocyte)
  • NOTE: Leukocyte response can indicate pathogenic effects such as poisoning and cell damage.
More harmful effects of microwaving
The research, from Pediatrics (vol. 89, no. 4, April 1992) on microwaving human breast milk:
  • Cuts down on lysozyme activity
  • Reduces key antibodies
  • Promotes potentially dangerous bacteria.
  • Milk heated to 72 degrees lost a full 96% of all immunoglobulin-A antibodies, which fight invading microbes.
Researcher’s conclusion: microwaving likely reduces and reverses the potential benefits of food, above and beyond the harm heating itself causes.
Another study of microwave problems reported in the journal The Lancet showed that when infant formula was microwaved for ten minutes, it altered the structure of its component amino acids, possibly resulting in functional, structural and immunological abnormalities.
The additional EMF field of a microwave
Even if your microwave oven were perfectly sealed, you would still be exposed to a harmful level of EMFs. That’s because all appliances working on electricity produce a toxic electromagnetic field that’s on 24/7 running the clock and more. This magnetic field can penetrate the body.
Electrical fields are the part of electromagnetic fields (EMFs) that can be shielded.
Magnetic fields are the part of electromagnetic fields (EMFs) that penetrate concrete, steel and human bodies. (Which is why they’re great for x-rays!) Unfortunately, they can have serious health implications. (See EMF explained and EMF health risks.)
EMF fields are measured in milliGauss (mG). One milliGauss is 1/1000 of a Gauss)
  • .5 mG to 2.5mG: For safety, the EPA recommends you limit your magnetic field exposure to .5 mG to 2.5mG.
  • 1-25 mG: exposure from a microwave at 3 feet
  • 100-500mG: exposure from microwave at 4 inches

Protection From Dangerous EMF's Of Power Lines

Technologies To Treat And Transform Harmful EMFs
Over years of research and testing, we’ve developed proven technologies specifically developed to interact with and transform even the more powerful EMFs. (See independent laboratory testing.)
Our devices are imprinted with proprietary patterns (coded information) that literally influence artificial electromagnetic fields. When this information is added to a harmful wavelength, that wavelength is transformed to a benign, even positive influence on biological life it surrounds
Clears ambient fields for large-area EMF protection

How they protect you from geopathic stress zones:
GeoResonators are designed to influence and interact with all types of energy fields found in the earth and soil. Each GeoResonator is encoded with a comprehensive program of transformative subtle energies that resonate with the elements of the earth and atmosphere. When planted in the earth a profound balancing and healing effect occurs in the soil, plants, trees and waterways. Because they resonate with each other setting up a matrix of 4 is suggested. Once planted everything within the matrix is positively affected and potentially transformed. Toxic vibrations in the earth are transmuted and the natural life force is restored. They are particularly effective in clearing Geopathic stress zones and toxic electromagnetic waves from ground current. Once the area is energy balanced, the transformed earth energy imprints into conductive materials such as metal, concrete and brick structures in and above the ground. More GeoResonators can be planted beyond the original matrix to extend the effect out over larger geographic areas. Single GeoResonators can also be used on sick plants, trees, or in gardens. Planting them in small waterways, brooks and ponds is also suggested.

Plant them around your home your neighborhood and specific toxic areas to transform and balance your environment
GeoResonators

Clear yards, parks, farms and neighborhoods from dangerous EMF’s
GeoResonators
Clear dangerous electromagnetic fields where you live, work and play. When placed in the ground, GeoResonators neutralize EMF radiation pollution, restore balance to areas of geopathic stress, and support healthy biological processes in and above the land. Each 2 x 2" patch is encoded with the polarizing patterns of very senior subtle energies that specifically address imbalanced energies in the earth, surrounding space and provide superior EMF protection.

Get protection from geopathic stress zones and earth energy distortions
GeoResonators
When planted in a matrix of 4, they resonate & interact with each other
GeoResonators
Found to have a strengthening and calming effect on all life systems within the treated area.
Each GeoResonator is imprinted with a range of harmonizing and resonant patterns that positively influence the underground environment, including:
  • Full color spectrum that supports life processes
  • Energy imprints of 64 minerals corresponding to the 64 resonant minerals in the earth
  • Geomagnetic earth pattern to balance soil & land
  • Patterns to support atmospheric balance and geopathic stress protection

Living Near Power Lines & Cancer

EMF Pollution from Living Near Power Lines - Solved?
Power lines and electrical poles have become so common on the landscape, they are virtually invisible. But it’s worth taking a hard look at them. Are you living near power lines? What is that barrel-shaped device on the electric pole and is it harmful? Did you grow up near a high-voltage power line?
Is there a safe living distance from or to power lines?
Experts say as far as possible … Hundreds of studies worldwide have shown that living next to high voltage power lines and other parts of the power transmission network increases your risk of cancer and other health problems.
We’ll examine those risks below, and the recommended SafeSpace solutions designed to minimize and eliminate the health risks.
Safe Living Distance to Power LinesSafe Living Distance To Power Lines?
Is It Harmful To Sit Under Power Lines?
Absolutely possible. It depends on how powerful are the EMFs coming from your neighborhood power lines? The electrical power grid uses a “step down” system of distribution, highest near the generating station and substations, lowest at the end. The closer you are the more you are bombarded with dangerous EMFs.
Living Under Power Lines? Some Facts You Should Know
High voltage transmission lines (those towering metal power lines you often see usually along highways and across rural landscapes. Some folks, unfortunately are under them.):
  • Use high voltage direct current (HVDC) to transmit large amounts of power from the generating station over long distances
  • Voltage varies from 138kV to 765kV
  • Radiate powerful electromagnetic fields (EMFs)
  • Linked to diseases in animals and humans
  • There is growing speculation that the values of homes near major power lines will soon begin to decrease because of this threat
Transmission substations, (which often look like a fenced-in thicket of metal structures. Maybe you see one near your home, school or office.):
  • Contain circuit breakers, switches and transformers
  • Decrease the voltage coming from high voltage transmission lines
  • Connect to local, lower voltage distribution lines.
  • Reroute power to lines that serve local markets
  • Suspected cause of cancer clusters for nearby residents
Lower voltage distribution lines, (or local power poles, which are everywhere):
  • Are smaller than the huge high voltage lines
  • More likely to be seen in residential areas
  • Sometimes buried
  • Risk varies with strength of voltage
Transformers, (those barrel-like metal trashcans mounted on power poles are EMF factories.):
  • Reduces the voltage to the 120-/240 current needed by the nearby homes
  • The typical power line feeding the transformer is carrying 4000 to 13,000 volts
  • Creates a strong field extending up to a 1/4 of a mile
  • The strength of this field decreases significantly with distance (the further away you are the better, even if you are still within a quarter mile)
  • Health risk depends on strength of incoming power line
Buried lines and transformers (Recognizable by a metal box located on the ground near the street.):
  • Some people contend that burying power lines can mitigate EMF dangers.
  • Other experts note that while burying power lines will shield the electric component of the electromagnetic field (EMF), the magnetic component can still pass through the earth—and walls and human bodies.
Electric Fields, Magnetic Fields & Power Lines are a Health Hazard!
There is no question that power transmission apparatus emit electromagnetic fields (EMFs).
An EMF is not just one thing, but two kinds of fields:
  • Electrical field: the part of the EMF that can easily be shielded.
  • Magnetic field: part of the EMF that can penetrate stone, steel and human flesh. In fact, when it comes to magnetic fields, human flesh and bone has the same penetrability as air!
  • Both fields are invisible and perfectly silent: if you live in an area with electric power, cell phone service, water pipes and more, some level of artificial EMF is surrounding you.
Living Close to Power Lines and How EMFs Harm Human Health
Your body acts like an energy wave broadcaster and receiver, incorporating and responding to EMFs. In fact, scientific research has demonstrated that every cell in your body may have its own EMF, helping to regulate important functions and keep you healthy.
Strong, artificial EMFs like those from power lines can scramble and interfere with your body’s natural EMF, harming everything from your sleep cycles and stress levels to your immune response and DNA!
Studies Show Living Next To Power Lines Increases The Risk Of Cancer
After hundreds of international studies, the evidence linking EMFs to cancers and other health problems is loud and clear. High Voltage power lines are the most obvious and dangerous culprits, but the same EMFs exist in gradually decreasing levels all along the grid, from substations to transformers to homes.
From the British Medical Journal, June, 2005:
Researchers found that children living within 650 feet of power lines had a 70% greater risk for leukemia than children living 2,000 feet away or more.
From Epidemiology, 2003 Jul;14(4):413-9:
“Several studies have identified occupational exposure to extremely low-frequency electromagnetic fields (EMF) as a potential risk factor for neurodegenerative disease.”
From Epidemiology, 2002 Jan;13(1):9-20
There is “strong prospective evidence that prenatal maximum magnetic field exposure above a certain level (possibly around 16 mG) may be associated with miscarriage risk.”
From the Internal Medicine Journal, 2007
In a study of 850 lymphoma, leukemia and related conditions, researchers from the University of Tasmania and Britain's Bristol University found that living for a prolonged period near high-voltage power lines increased the risk for these conditions later in life.
  • People who lived within 328 yards of a power line up to age 5 were five times more likely to develop cancer as an adult.
  • People who lived within 328 yards of a power line at any point up to age 15 years were three times more likely to develop cancer as an adult.
Dr. David Carpenter, Dean of the School of Public Health (SUNY), believes that up to 30% of all childhood cancers come from exposure to high voltage power lines.
Even the Environmental Protection Agency (EPA) cautions citizens that "There is reason for concern" and advises “prudent avoidance” of high voltage power lines.
The California Department of Health concluded that EMFs were responsible for an increase in childhood leukemia, adult brain cancer, Lou Gehrig's disease and miscarriage in the 2002 report, “An Evaluation of the Possible Risks From Electric and Magnetic Fields (EMFs) From Power Lines, Internal Wiring, Electrical Occupations and Appliances.”
The studies cited above and dozens of other epidemiological studies specifically link high voltage power lines with:
  • Brain tumors
  • Leukemia
  • Birth defects
  • Lymphoma
Electromagnetic Radiation and Power Lines. It‘s a Problem.
According to research and publications put out by the World Health Organization (WHO), EMF such as those from power lines, can also cause:
  • Headaches
  • Fatigue
  • Anxiety
  • Insomnia
  • Prickling and/or burning skin
  • Rashes
  • Muscle pain
You Need EMF Shielding From Electrical Power Lines & Transformers!
High voltage power lines, and radiation are something that can affect urban and rural communities alike. In truth, few residential areas escape this threat. For now, it’s critical to understand your risk of liivng close to power lines and how protect the area around you.

Harmful Electrostress from Computers/Laptops

How to Protect Yourself From Computer Radiation and Laptop Computer EMF
Are you reading this on a computer? If you are, then you’re face to face with a potentially dangerous electromagnetic field (EMF) especially to the head and upper body. . The EMFs generated by your screen and machine could be seriously damaging your health.
The Bad Effects Of Computer Radiation…
We’ll examine the EMF radiation from different types of desktop and laptop computers, what that means for your health, and the SafeSpace products that can protect you while you work, surf and socialize online.
What is Computer Radiation & Where Does it Come From?
CRT (Cathode Ray Tube) screen radiation - If your desktop monitor (or TV) is a few years old and has a deep cabinet, chances are it’s a CRT. CRTs are by far the most dangerous type of screen.
  • Few desktop computers are made with CRT screens anymore (though some video gamers still prefer them).
  • The images produced by CRT screens involve a number of processes, including the front of the tube being scanned downward in a pattern of lines, electron beams “sweeping” an image across the screen by modulating their intensity, a coil generating magnetic field and more.
The Health Dangers of CRTs
  • Small amounts of radiation (x-ray frequencies and others) are emitted as the electrons sweep the screen.
  • At close range, this radiation (literally pulsating fields of energy) puts biological stress on humans, animals and plants.
  • CRTs also operate at an extremely high voltage, which continues on long after the computer has been turned off.
LCD ( Liquid Crystal Display) Screens Radiation - these screens are flatter, often appearing as panels. LCD screens are safer than CRTs.
  • Display is composed of color or monochrome pixels that are filled with liquid crystals.
  • Liquid crystals are lit by a backlight or reflector.
  • LCD screens utilize very small amounts of electric power.
Computer Radiation & Screens - The Health Dangers of LCD Monitors
  • Laptops and desktop computers with LCD screens are significantly safer than CRT screens, but they still emit low levels of radiation—enough to harm your health.
  • It’s more than the screen: all TV sets and computers, no matter what the technology, radiate a relatively strong EMF consisting of 50Hz – 60 Hz and higher.
Computer EMFs and the Radiation Dangers To Your Health
Electromagnetic fields (EMFs) don’t only come from your computer screen. The electronics inside your computer generate a powerful EMF.
  • Studies have shown EMF exposure above 2 milligauss (mG) begins to harm biological organisms.
  • Prolonged exposure to higher levels, from 2 mG and above, has been associated with cancer and immune system effects.
  • At 3 feet away, computers typically measure frommeasure 2mGfrom 2mG to 5 mG.
  • At 4 inches and closer, computers measured from 4mG all the way to 20 mG.
EMF Exposure: The Early Signs
People are spending more and more time in front of computer screens. Early signs of overexposure to EMFs include muscle aches, insomnia, stress,stress and fatigue.
Radiation Exposure: Aging
Radiation exposure at these levels can result in skin “burns,” dry, wrinkled skin and what is known as “photo aging.”
Electromagnetic Field Exposure Over Time…
Countless epidemiological studies, from The British Medical Journal to the World Health Organization (WHO) to the California Department of Health, have linked EMFs to lymphoma, leukemia, autoimmune system deficiencies, birth defects, tumors, insomnia, heart problems and more.
Negative Effects of Computer Radiation - Laptops
Close proximity of EMFs - It’s been shown that EMF strength decreases with distance. The fact that the laptop is often situated right next to your body means you’re receiving your computer’s radiation at its fullest strength.
Laptop Radiation & Male Infertility - the use of laptops (especially when situated on the lap near the reproductive organs) has been connected to male infertility. (Journal of Human Reproduction). Theories why include the heat from the machine itself on the scrotum, or radiation from the EMF at such a close distance. YOU Need Laptop Radiation Protection!


Protection Against Cell Phone Radiation

Cell Phone Patch
Proven protection against cell phone radiation
Cell Phone Patch
Our laboratory-tested and clinically proven cell phone patch has been proven to transform and neutralize cell phone radiation - without affecting reception. The SafeSpace Cell Phone Patch features a non-electric metal substrate hologram encoded with frequency information that interacts with and influences EMFs, effectively protecting you against their harmful effects. The coded hologram is encased in a clear plastic tab with an adhesive back. Place it on the back of the phone or other device. Works immediately.
Converts harmful cell phone radiation to safe EMFs
For use on all types of wireless handheld devices:
all cell phones smart phones, ipods, blackberrries
bluetooth tech. cordless phones and more
Peace of mind for wireless and mobile phone users
Cell phones emit potentially dangerous radiation from the antenna that connects to the cell tower signal, the phone circuitry and battery. The most intense radiation occurs when your signal is being sent or received (dialing and ringing). But the continuous EM radiation from wireless phones turned on has been shown to cause serious health effects, even when the phone is sitting in your pocket. Earphones and speakers don’t eliminate the dangers.
Cell Phone Patch
Proven Effective in DNA Testing
Cell Phone Patch
Independent laboratory testing showed that the detrimental effect was completely neutralized when the SafeSpace patch was attached to the cell phone In fact, normal rewinding was enhanced when the DNA exposed to neutralized EMF from the cell phone with the SafeSpace attached. More about testing.
Since the 1950’s, it’s been known that heat shock unwinds the two strands of DNA. As the DNA cools, it recovers by rewinding into an intact double helix.
EMFs from cell phones were shown to have a statistically significant detrimental effect on DNA rewinding. In fact the cell phone energy was so toxic to the DNA that it not only prevented the natural rewinding process, it caused the DNA to further unwind.

Cell Phone Radiation & Health

Cell Phone Radiation
Electromagnetic Radiation & Health
YOU SHOULD KNOW - Approximately 20-80% of the cell phone radiation from your mobile device’s antenna penetrates up to 2 inches into the adult brain.
Penetration of radiation on brain of an adult, a 10 year old and a 5 year old

Cellphone Electromagnetic Radiation & Health Hazards

Anytime the power is turned on, cell phones emit electromagnetic radiation – even in stand-by mode and regardless if carried on belts, in pockets or purses, expose other areas of the body to harmful ELF radiation, as well.
Some of the potential side effects of exposure to electromagnetic radiation:
  • Blurry Vision
  • Headaches
  • Nausea
  • Fatigue
  • Neck Pain
  • Memory Loss
  • Leukemia
  • Rare Brain Cancers
  • Enzyme Changes That Affect DNA
  • Birth Defects
  • Changes In Metabolism
  • Increased Risk For Alzheimer’s Disease
  • Increased Risk For Heart Conditions
  • Neurological Hormone Changes Linked Impaired Brain Function
  • And More…
Additional studies have shown that people who sleep with a cellphone by the bed have poor REM sleep, leading to impaired learning and memory. This is related to melatonin production that is impaired by the ELF radiation emitting from your nearby cell phone or wireless device.
Electromagnetic Radiation and Health Issues
As confirmed medical studies show, that may be exactly what you’re doing with every use of your mobile phone, allowing the electromagnetic fields (ELF) it constantly produces to bombard your body and your brain.
Side effects from cell phone radiation ranging from occasional headaches and fatigue to enzyme changes that affect DNA and cell growth and can result in cancer.
But, that’s not all. Cellphones emit electromagnetic radiation from its antenna, as well as from the circuitry and battery – all of which can cause harmful biological effects
Every cell phone model sold in the United States has a specific measurement of how much microwave energy from the phone can penetrate the brain.
Studies have shown that if the cellphone signal is held next to the brain there are changes in the brainwaves in 70% of people. This testing was done at a level of about 2 microwatts per sq. cm., which is only a fraction of the actual cell phone radiation exposure experienced from the typical mobile device.
Such ongoing studies have prompted the US Government to set “safe guidelines” for cellphone manufacturers to adhere to, but simply put, this just isn’t enough. And with your health at risk, can you really afford to ignore the mounting documented evidence – more than 2,000 research studies from around the world, all confirming that the cell phone radiation produced by your PDA could be to blame for:
Cell phone health hazards
Keep in mind such devastating health risks mount with every use of your iphone, blackberry, PDA, mobile phone or other mobile device, making the likelihood that you or someone you love will suffer needlessly simply far too great to ignore.
You may have recent read about electromagnetic radiation exclusion and insurance in the same sentence. Yes, it is true. Many insurance companies are now excluding health issues related to cell phone radiation exposure. This mean if you have a health issue related to wireless phone radiation exposure you may not be covered.
Most people cannot be without a cellphone. Now more than ever you need a way to protect yourself and your loved ones.
SafeSpace has the solution. With years of research and development
SafeSpace now introduces the Cell Phone and Wireless Communication Protection Device. It fits any budget, costing less than a week’s worth of morning cappuccinos.

چاند کا دوٹکڑے ہونااور جدید سائنس


چاند کا دوٹکڑے ہونااور جدید سائنس

اپالو 10اور 11کے ذریعے ناسانے چاند کی جو تصویر لی ہے اس سے صاف طور پر پتہ چلتاہے کہ زمانہ ماضی میں چاند دو حصوںمیں تقسیم ہوا تھا ۔یہ تصویر ناسا کی سرکاری ویب سائٹ پر موجود ہے اور تاحال تحقیق کامرکز بنی ہوئی ہے ۔
ناسا ابھی تک کسی نتیجے پر نہیں پہنچی ہے ۔ا س تصویر میں راکی بیلٹ کے مقام پر چاند دوحصوں میں تقسیم ہوا نظر آتاہے۔ ایک ٹی وی انٹرویو میں مصر کے ماہر ارضیات... ڈاکٹر زغلول النجار سے میزبان نے اس آیت کریمہ کے متعلق پوچھا
(اِ قْتَرَ بَتِ السَّا عَةُ وَ انْشَقَّ الْقَمَرُ 0 وَ اِنْ یَّرَ وْ ا اٰ یَةً یُّعْرِ ضُوْ ا وَ یَقُوْ لُوْ ا سِحْرُ مُّسْتَمِرُّ 0 وَ کَذَّ بُوْا وَ اتَّبَعُوْا اَھْوَآ ءَ ھُمْ وَ کُلُّ اَمْرٍ مُّسْتَقِرُّ 0)
قیامت قریب آ گئی اور چاند پھٹ گیا .یہ اگر کوئی معجزہ دیکھتے ہیں تو منہ پھیر لیتے ہیں اور کہہ دیتے ہیں یہ پہلے سے چلا آتا ہوا جادو ہے۔انہوں نے جھٹلایا اور اپنی خواہشوں کی پیروی کی اور ہر کام ٹھہرے ہوئے وقت پر مقرر ہے۔'' ۔
( القمر، 1-3
ڈاکٹرزغلول النجارکنگ عبدالعزیز یونیورسٹی جدہ میں ماہر ارضیات کے پروفیسرہیں۔ قرآن مجید میں سائنسی حقائق کمیٹی کے سربراہ ہیں ۔ اورمصرکی سپریم کونسل آف اسلامی امور کی کمیٹی کے بھی سربراہ ہیں۔ انہوں نے میزبان سے کہاکہ اس آیت کریمہ کی وضاحت کے لیے میرے پاس ایک واقعہ موجود ہے ۔انہوں نے اس واقعہ کی وضاحت کرتے ہوئے کہا کہ ایک دفعہ میں برطانیہ کے مغرب میں واقع کارڈ ف یونیورسٹی میں ایک لیکچر دے رہا تھا ۔جس کوسننے کے لیے مسلم اور غیر مسلم طلبا ء کی کثیر تعداد موجود تھی ۔قرآن میں بیان کردہ سائنسی حقائق پر جامع انداز میں گفتگو ہورہی تھی کہ ایک نو مسلم نوجوان کھڑ ا ہوا اور مجھے اسی آیت کریمہ کی طرف اشارہ کرتے ہوئے کہا کہ سر کیا آپ نے اللہ تعالیٰ کے اس فرمان پر غور فرمایا ہے ، کیا یہ قرآن میں بیان کردہایک سائنسی حقیقت نہیں ہے ۔ڈاکٹر زغلول النجار نے جواب دیتے ہوئے کہا کہ نہیں! کیونکہ سائنس کی دریافت کردہ حیران کن اشیاء یا واقعات کی تشریح سائنس کے ذریعے کی جاسکتی ہے مگر معجزہ ایک مافوق الفطرت شے ہے ،جس کو ہم سائنسی اصولوں سے ثابت نہیں کرسکتے ۔چاند کا دوٹکڑے ہوناایک معجزہ تھا جس کو اللہ تعالیٰ نے نبوت محمد ی صلی اللہ علیہ وسلم کی سچائی کے لیے بطوردلیل دکھایا ۔حقیقی معجزات ان لوگوں کے لیے قطعی طورپر سچائی کی دلیل ہوتے ہیں جو ان کا مشاہدہ کرتے ہیں۔ ہم اس کو اس لیے معجزہ تسلیم کرتے ہیں کیونکہ اس کا ذکر قرآن وحدیث میں موجود ہے ۔اگر یہ ذکر قرآن وحدیث میں موجودنہ ہوتاتو ہم اس زمانے کے لو گ اس کو معجزہ تسلیم نہ کرتے ۔علاوہ ازیں ہمار ااس پر بھی ایمان ہے کہ اللہ ہر چیز پر قدرت رکھتاہے ۔

پھر انہوں نے چاند کے دوٹکڑے ہونے کے واقعہ کو بیان کرتے ہوئے کہاکہ احادیث کے مطابق ہجرت سے 5سال قبل قریش کے کچھ لوگ حضور صلی اللہ علیہ وسلم کے پاس آئے اور انہوں نے کہا کہ اگر آپ واقعی اللہ کے سچے نبی ہیں تو ہمیں کوئی معجزہ دکھائیں ۔حضور صلی اللہ علیہ وسلم نے ان سے پوچھا کہ آپ لوگ کیا چاہتے ہیں ؟انہوں نے ناممکن کام کا خیال کرتے ہوئے کہا کہ اس چاند کے دو ٹکڑے کر دو۔چناچہ حضور صلی اللہ علیہ وسلم نے چاند کی طرف اشارہ کیا اور چاند کے دو ٹکڑے ہو گئے حتٰی کہ لوگوں نے حرا پہاڑ کو اس کے درمیان دیکھا . یعنی اس کا ایک ٹکڑا پہاڑ کے اس طرف اورایک ٹکڑا اس طرف ہو گیا۔ ابن مسعود فرماتے ہیں سب لوگوں نے اسے بخوبی دیکھا اورآپ صلی اللہ علیہ وسلم نے فرمایا دیکھو ،یادرکھنا اور گواہ رہنا۔کفار مکہ نے یہ دیکھ کر کہا کہ یہ ابن ابی کبشہ یعنی رسول اللہ صلی اللہ علیہ وسلم کا جادو ہے ۔کچھ اہل دانش لوگوں کا خیال تھا کہ جادو کا اثر صرف حاضر لوگوں پر ہوتاہے ۔اس کا اثر ساری دنیا پر تو نہیں ہو سکتا ۔چناچہ انہوں نے طے کیاکہ اب جولوگ سفر سے واپس آئیں ان سے پوچھو کہ کیا انہوں نے بھی اس رات چاند کو دو ٹکڑے دیکھاتھا۔چناچہ جب وہ آئے ان سے پوچھا ، انہوں نے بھی اس کی تصدیق کی کہ ہاں فلاں شب ہم نے چاند کے دوٹکڑے ہوتے دیکھاہے ۔کفار کے مجمع نے یہ طے کیا تھا کہ اگر باہر کے لوگ آ کر یہی کہیں تو حضور صلی اللہ علیہ وسلم کی سچائی میں کوئی شک نہیں ۔اب جو باہر سے آیا ،جب کبھی آیا ،جس طرف سے آیا ہر ایک نے اس کی شہادت دی کہ ہم نے اپنی آنکھوں سے دیکھاہے ۔ا س شہادت کے باوجود کچھ لوگوں نے اس معجزے کا یقین کرلیا مگر کفار کی اکثریت پھر بھی انکار پر اَڑی رہی۔
اسی دوران ایک برطانوی مسلم نوجوان کھڑا ہوا اور اپنا تعارف کراتے ہوئے کہاکہ میر انام داؤد موسیٰ پیٹ کاک ہے۔میں اسلامی پارٹی برطانیہ کا صدر ہوں۔وہ اپنی بات جاری رکھتے ہوئے بولا کہ سر !اگر آ پ اجازت دیں تو اس موضوع کے متعلق میں بھی کچھ عرض کرنا چاہتاہوں ۔مَیں نے کہا کہ ٹھیک ہے تم بات کرسکتے ہو!اس نے اپنی بات کو آگے بڑھاتے ہوئے کہا کہ اسلام قبول کرنے سے پہلے جب میں مختلف مذاہب کی تحقیق کر رہا تھا،ایک مسلمان دوست نے مجھے قرآن شریف کی انگلش تفسیر پیش کی ۔مَیں نے اس کا شکریہ ادا کیا اور اُسے گھر لے آیا ۔گھر آکر جب میں نے قرآن کو کھولا تو سب سے پہلے میری نظر جس صفحے پر پڑی وہ یہی سورة القمر کی ابتدائی آیات تھیں ۔ان آیات کا ترجمہ اور تفسیر پڑھنے کے بعدمیں نے اپنے آپ سے کہا کہ کیا اس بات میں کوئی منطق ہے ؟کیا یہ ممکن ہے کہ چاند کے دو ٹکڑے ہوں اور پھر آپس میں دوبارہ جڑ جائیں ۔وہ کونسی طاقت تھی کہ جس نے ایسا کیا ؟ان آیات کریمہ نے مجھے اس بات پر آمادہ کیا کہ میں قرآن کامطالعہ برابرجاری رکھوں ۔کچھ عرصے کے بعد مَیں اپنے گھریلو کاموں میں مصروف ہوگیا مگر میرے اندر سچائی کو جاننے کی تڑپ کا اللہ تعالیٰ کو خوب علم تھا ۔
یہی وجہ ہے کہ خدا کا کرنا ایک دن ایساہوا کہ میں ٹی وی کے سامنے بیٹھا ہوا تھا ۔ٹی وی پر ایک باہمی مذاکرے کا پروگرام چل رہاتھا ۔جس میں ایک میزبان کے ساتھ تین امریکی ماہرین فلکیات بیٹھے ہوئے تھے ۔ٹی وی شو کا میزبان سائنسدانوں پر الزامات لگا رہا تھا کہ اس وقت جب کہ زمین پر بھوک ،افلاس ،بیماری اورجہالت نے ڈھیرے ڈھالے ہوئے ہیں ،آپ لوگ بے مقصد خلا میں دورے کر تے پھررہے ہیں۔جتنا روپیہ آپ ان کاموں پر خرچ کر رہے ہیں وہ اگر زمین پر خرچ کیا جائے تو کچھ اچھے منصوبے بنا کر لوگوں کی حالت کو بہتر بنایا جاسکتا ہے ۔بحث میں حصہ لیتے ہوئے اور اپنے کام کا دفاع کرتے ہوئے اُن تینوں سائنسدانوں کا کہنا تھا کہ یہ خلائی ٹیکنالوجی زندگی کے مختلف شعبوں ادویات ،صنعت اور زراعت کو وسیع پیمانے پر ترقی دینے میں استعما ل ہوتی ہے۔انہوں نے کہاکہ ہم سرمائے کو ضائع نہیں کررہے بلکہ اس سے انتہائی جدید ٹیکنالوجی کو فروغ دینے میں مدد مل رہی ہے ۔جب انہوں نے بتایا کہ چاند کے سفر پر آنے جانے کے انتظامات پر ایک کھرب ڈالر خرچ آتاہے تو ٹی وی میزبان نے چیختے ہوئے کہا کہ یہ کیسافضول پن ہے ؟ایک امریکی جھنڈے کو چاند پر لگانے کے لیے ایک کھرب ڈالر خرچ کرنا کہا ں کی عقلمندی ہے ؟سائنسدانوں نے جوابا ً کہا کہ نہیں ! ہم چاند پر اس لیے نہیں گئے کہ ہم وہاں جھنڈا گاڑ سکیں بلکہ ہمارا مقصد چاند کی بناوٹ کا جائزہ لیناتھا ۔دراصل ہم نے چا ند پر ایک ایسی دریافت کی ہے کہ جس کا لوگوں کویقین دلانے کے لیے ہمیں اس سے دوگنی رقم بھی خرچ کرنا پڑسکتی ہے۔مگر تاحال لوگ اس بات کو نہ مانتے ہیں اور نہ کبھی مانیں گے۔میزبان نے پوچھا کہ وہ دریافت کیا ہے؟انہوں نے جواب دیتے ہوئے کہا کہ ایک دن چاند کے دوٹکڑے ہوئے تھے اورپھر یہ دوبارہ آپس میں مل گئے۔میزبان نے پوچھاکہ آپ نے یہ چیز کس طرح محسوس کی ؟ انہوں نے کہا کہ ہم نے تبدیل شدہ چٹانوں کی ایک ایسی پٹی وہا ں دیکھی ہے کہ جس نے چاند کو اس کی سطح سے مرکز تک اور پھر مرکز سے اس کی دوسری سطح تک، کو کاٹا ہوا ہے ۔انہوں نے مزید کہا کہ ہم نے اس بات کا تذکرہ ارضیاتی ماہرین سے بھی کیا ہے۔ ان کی رائے کے مطابق ایسا ہرگز اس وقت تک نہیں ہوسکتا کہ کسی دن چاند کے دو ٹکڑے ہوئے ہوں اور پھر دوبارہ آپس میں جڑبھی گئے ہوں۔
برطانوی مسلم نوجوان نے بتایا کہ جب مَیں نے یہ گفتگو سنی تو اپنی کرسی اچھل پڑا اوربے ساختہ میرے منہ سے نکلا کہ اللہ نے امریکیوں کو اس کام کے لیے تیا رکیا کہ وہ کھربوں ڈالر لگاکر مسلمانوں کے معجزے کو ثابت کریں ، وہ معجزہ کہ جس کا ظہور آج سے 14سو سال قبل مسلمانوں کے پیغمبر کے ہاتھوں ہوا۔مَیں نے سوچا کہ اس مذہب کو ضرور سچا ہوناچاہیے ۔میں نے قرآن کو کھولا اور سورة القمر کو پھر پڑھا۔درحقیقت یہی سورة میرے اسلام میں داخلے کا سبب بنی۔

علاوہ ازیں انڈیاکے جنوب مغرب میں واقع مالابار کے لوگوں میں یہ با ت مشہور ہے کہ مالابار کے ایک بادشاہ چکراوتی فارمس نے چاند کے دو ٹکڑے ہونے کامنظر اپنی آنکھوں سے دیکھاتھا ۔ا س نے سوچاکہ ضرور زمین پر کچھ ایساہو اہے کہ جس کے نتیجے میں یہ واقعہ رونما ہوا ۔چناچہ اس نے اس واقعے کی تحقیق کے لیے اپنے کارندے دوڑائے تو اسے خبر ملی کہ یہ معجزہ مکہ میں کسی نبی کے ہاتھوں رونما ہوا ہے ۔اس نبی کی آمد کی پیشین گوئی عرب میں پہلے سے ہی پائی جاتی تھی ۔چناچہ اس نے نبی صلی اللہ علیہ وسلم سے ملاقات کا پروگرام بنایا اوراپنے بیٹے کو اپنا قائم مقام بنا کرعرب کی طرف سفر پر روانہ ہوا۔وہاں اس نے نبی رحمت صلی اللہ علیہ وسلم کی بارگاہ میں حاضری دی اور مشرف بااسلام ہوا۔نبی کریم صلی اللہ علیہ وسلم کی ہدایت کے مطابق جب و ہ واپسی سفر پر گامزن ہوا تو یمن کے ظفر ساحل پراس نے وفات پائی ۔یمن میں اب بھی اس کا مقبر ہ موجودہے۔جس کو ''ہندوستانی راجہ کا مقبرہ''کہا جاتاہے اور لوگ اس کودیکھنے کے لیے وہاں کا سفر بھی کرتے ہیں۔اسی معجزے کے رونما ہونے کی وجہ سے اورراجہ کے مسلمان ہونے کے سبب مالابار کے لوگوں نے اسلام قبول کیا تھا۔اس طرح انڈیا میں سب سے پہلے اسی علاقے کے لوگ مسلمان ہوئے ۔بعدازاں انہوں نے عربوں کے ساتھ اپنی تجارت کو بڑھایا ۔نبی کریم صلی اللہ علیہ وسلم کی بعثت سے قبل عرب کے لوگ اسی علاقے کے ساحلوں سے گزر کر تجارت کی غرض سے چین جاتے تھے ۔یہ تمام واقعہ اور مزید تفصیلات لندن میں واقع''انڈین آفس لائبیریری''کے پرانے مخطوطوں میں ملتاہے۔جس کاحوالہ نمبر
ہے۔(Arabic ,2807,152-173)
اس واقعہ کا ذکر محمدحمیداللہ نے اپنی کتاب ''محمدرسول اللہ''میں کیاتھا۔ ناسا کی یہ تصویرچاند پر پائی جانے والی کئی دراڑوں میں سے ایک دراڑ کی ہے ۔ ہم وثوق سے تو نہیں کہہ سکتے کہ یہ وہی دراڑ ہے کہ جو معجزہ کے رونما ہونے کی بناء پر وجود میں آ ئی تھی مگر ہمارا ایمان ہے کہ معجزہ کے بعد چاند کی کچھ ایسی ہی صورتحال ہوئی ہو گی۔ بحرحال سائنسدانوں کے بیانات سے یہ بات ثابت ہوجاتی ہے کہ قرآن کریم نے جس واقعہ کا ذکر آج سے 14سو سال پہلے کیا تھا وہ بالکل برحق ہے ۔ یہ ناصر ف قرآن مجید کی سچائی کی ایک عظیم الشان دلیل ہے بلکہ یہ ہمارے پیارے نبی ،امام الانبیا ء کی رسالت کی بھی لاریب گواہی ہے۔ اللہ تعالیٰ ہمارے ایمان کو اکمل و کامل کرے اور ہمیں قرآن وحدیث کے مطابق اپنے عملوں کو سنوارنے کی توفیق عطا فرمائے۔ آمین۔